
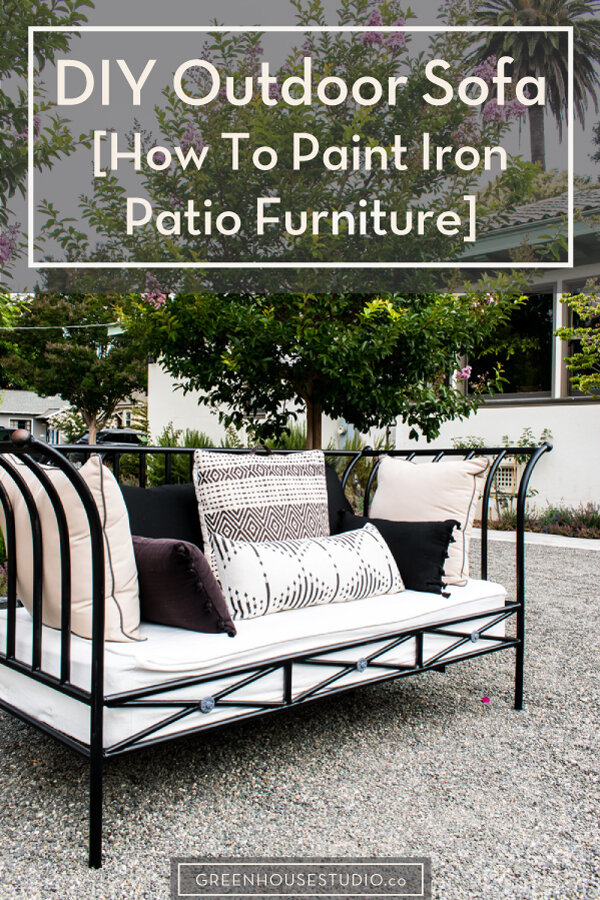
DIY Outdoor Sofa [How to Paint Iron Furniture]
Looking to create your own backyard oasis complete with an outdoor living room? Great goal! But then you go shopping for outdoor sofas and furniture and you have serious sticker shock. I’m right there with you.
Here’s a solution - with a little resourcefulness and elbow grease, you can DIY it. Source a sofa or daybed for cheap that can work outdoors and create a stylish statement-making piece for way less.
Want to know how I did it? Read on as I take you through my step-by-step process for my DIY outdoor sofa.
DIY Outdoor Sofa Backstory
How To Paint Iron Outdoor Furniture
Outdoor Sofa Outfitting
Outdoor Sofa Overwintering
DIY Sofa Cost vs. Purchasing New
[This post contains affiliate links. Click here to read my full disclosure.]
DIY Sofa Backstory
I completely overhauled my landscape a year ago (you can see my garden here.) I was finally at the point of putting together my “outdoor living room,” and I was excited to shop and find something fabulous.
And while I did find many lovely sofas, the prices were not so fab. I’m a girl who would rather fall on her sword (or lopper-pruners) than pay retail/overspend. To me, sourcing a “deal” is half the fun. And lemme tell ya, there were none to be had last year.
Maybe it’s always that way - as a landscape designer, I’ve only ever spent client money on outdoor furniture and those clients weren’t cost-sensitive.
Or perhaps retailers didn’t need to discount outdoor furniture since those of us fortunate enough to have an outdoor space were making the most of it, kitting them out to the nines since we didn’t have much alternative.
My garden in Napa CA. inspired by travels in Mediterranean climates (including California :)
[Want more design inspo and helpful plant tips? Let's hang out on Instagram!]
To make a long story endless, I found a beautiful outdoor sofa with a black iron metal base and cream Sunbrella cushions. I had slowly come around to the idea that I’d have to pay a high price because that’s all I saw for what I liked/needed.
So I actually bit the bullet and pressed the BUY button. A day or so later, I received an email informing me it wasn’t going to ship for a very long time (also typical of last year, right?).
I decided that wasn’t going to work, especially at that price, (why bother if it won’t arrive until the end of summer) and so I cancelled the order.

The sofa I originally purchased with a black iron base and Sunbrella outdoor fabric cushions. Image | LuxeDecor
Well I still wanted a patio sofa. After all, I had plans for lounging about while sipping Aperol Spritzes, or so I envisioned.
Now I needed to get creative (and this is where I get excited). And so I began perusing Facebook Marketplace and Craigslist in earnest.
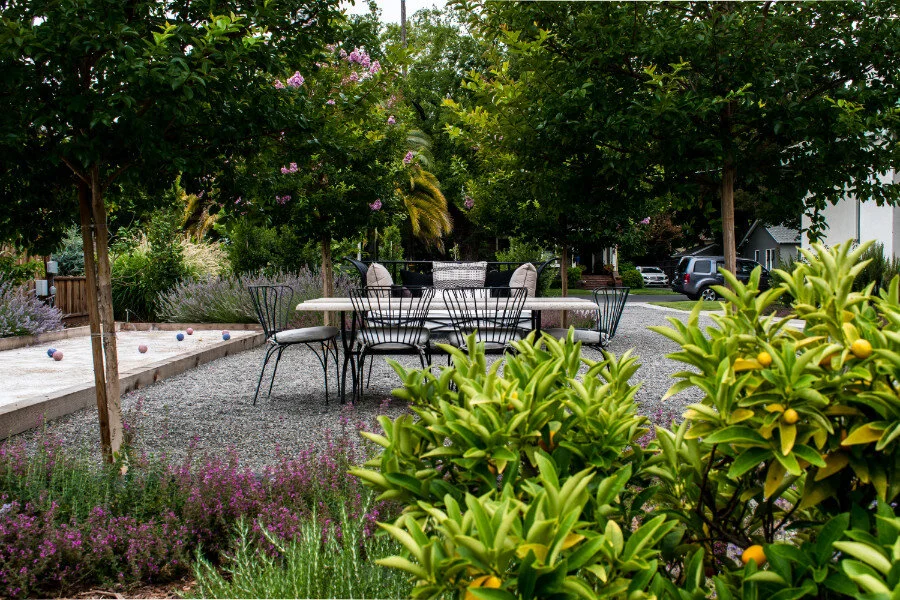
I already had my travertine and iron table, also a thrifted eBay find circa 2003, so I knew the sofa had to work with that along with my French-Mediterranean garden. Meaning it needed to a black iron frame with classical lines, and I’d finish it with off-white and black cushions of some sort.

My thrifted travertine table and iron base paired with iron Sevilla chairs and cushions from World Market. Image | Greenhouse Studio
Since 1/2 my house is furnished with Craigslist/eBay/FB Marketplace, it’s no shocker that I found something there. In San Francisco, a lady was giving away an iron day bed. Score!
My son wanted to practice driving and I needed the extra muscle, so we drove an hour into SF, barely managed to stuff it into my SUV, brought it home, and reassembled it. Reassembling was no picnic btw!

After priming the ends that slipped into each other, we reassembled the daybed. I thought we weren’t going to be able to do it because part of the frame was bent, but after a lot of swearing and rubber mallet action, my sons and I got it together.
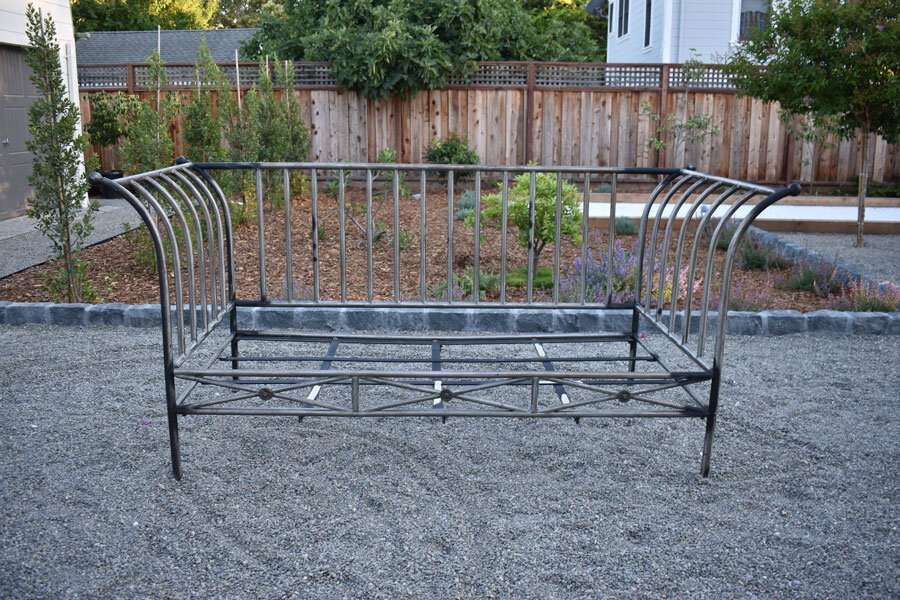
Here’s the outdoor daybed with the ends primed and finally assembled. Don’t use the same color primer as topcoat like I did at first. It’s impossible to tell if you’ve painted everything with the topcoat since it’s all the same color.

Sneak peek - the lines, materials, and colors all work together even though the table, chairs, and daybed are from different sources. This is the “secret” to creating a dynamic space that looks great together without being a matched set. Image | Greenhouse Studio
How to paint iron outdoor furniture
Supplies for painting iron
- Wire brush
- 3M metal finishing pad
- Tack cloth
- Drop cloths + painter's tape
- Rustoleum gray primer (use different primer color than final paint color!)
- Rustoleum flat black protective enamel
- Protective gloves

My daybed appeared to be unpainted iron and had light rust, especially on one side. I figure that side must have been closest to a window and exposed to the famous San Francisco fog.
Here’s what I did to prep and paint:
Remove rust. I used a coarse wire brush on the worst parts, then a metal finishing pad for light rust. The good thing about the finishing pad is that it’s flexible so it’s easier to hit curved parts.
Wipe down the frame thoroughly with tack cloth. Tack cloth is well, tacky, so it’s made for picking up residue. I didn’t pressure wash the frame ever. It seemed counter-intuitive to wash iron since my prep work was about removing rust.
Put down a dropcloth underneath your furniture and tape off anything that needs it.
Now you’re ready for primer. Make sure your primer is a different color than your main paint. I made the mistake of starting with black primer and it was impossible to know which was final paint or not. Allow it to dry according to the paint directions.
Paint over the primer with your metal topcoat paint. I did two coats. You’ll probably use more primer + topcoat paint than you think, so buy extra to avoid multiple trips to the hardware store.
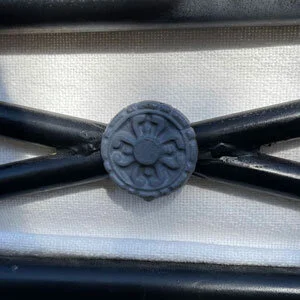
Finishing touches - the daybed has three medallions on the front. I taped off the black frame surrounding them and applied gold Rustoleum spray paint to each.


Outdoor sofa pillows and cushions
Daybed versus sofa
What is a daybed exactly? A daybed is a twin-sized mattress in a 3-sided frame so it looks like a sofa. This means it’s deeper than a normal couch, but I decided that would be ok if I added extra pillows for back support.
I made sure my daybed was the height of a normal sofa though. I almost bought another from World Market that looked beautiful but was very low, and I decided I didn’t want that.
My point here is it’s always important to carefully check your dimensions before you spend a lot of money or time on an item, including the interior dimensions of your car if you’re driving an hour each way to San Francisco! (For more on this, read about measuring and room layout on How To Design A Room).
Outfitting the daybed
I already had an extra twin mattress at home. I bought a nylon waterproof cover that completely encloses the mattress to protect it. (Twin mattresses are really easy to thrift for low cost or free btw.)
I needed a top cover and wanted one by Sunbrella or another outdoor fabric. All were over $200 though, so I decided to get a less expensive daybed cover from World Market.
I do regret it though and will probably spring for the Sunbrella twin mattress cover next season. I really like the fabric texture and color of the World Market cover, but wasn’t made for outdoors. It’s thick and durable and would be fine if protected, but it doesn’t stay clean since it’s not covered.
Sunbrella is kind of an outdoor miracle fabric - it’s super tight weave means most dirt is easily brushed off, it repels stains, and when it does get dirty, it can be rinsed down with a hose no problem.

I bought a combo of pillows in both outdoor/Sunbrella fabric and not.
The plain black and off-white ones are Sunbrella fabric via Overstock.
The patterned ones are from TJ Maxx and World Market - some are for outdoors and some aren’t. I was curious to see how non-outdoor pillows would hold up. So far they’re holding up well, although this being California, the only thing that rained on them either this or last summer is ash. :(
SHOP THE LOOK


Outdoor Sofa Overwintering
Again since it’s California and all, I didn’t move the daybed into the garage, just the pillows and the mattress top-cover. Ideally I would have, especially to protect the mattress, but that whole iron + mattress contraption is very heavy!
Instead I bought a patio furniture cover through Amazon . This took some serious searching since the daybed is a larger size than a typical patio sofa.
I quickly learned I need to provide a high-point under the cover, otherwise it fills with rain! I’m thinking a traffic cone parked in the middle of the mattress under the cover would do the job nicely if anyone has a spare. :)
Paint repair
The only parts that needed fixing this season were the finial knobs where the patio furniture cover rubbed the paint off. They need to be sanded down again to remove rust and then repainted. Have I done it? Nope, and don’t hold your breath on that one either.

I put this cover on because of the wildfire ash earlier this week, but come winter, I need to put something underneath to create a high-point so I’m not bailing water from the middle like last winter.
DIY Patio Daybed Cost
All in all, I spent close to $500 once it was all said and done. Again, the daybed was free outside of gas and bridge toll to San Francisco. Most of the cost was for cushions and the mattress cover. Plus my time, which should always be taken into account too.
So it wasn’t inexpensive for sure, but still $1,100 less than the one I first purchased and cancelled. Plus I just checked, and that same sofa is now being sold for $300 more than last year.

So that’s the story of my DIY outdoor daybed. It felt good to do it as a DIY rather than buy the expensive-but-beautiful outdoor sofa that was the original plan. I hadn’t done a project like that in a while, I had fun with it, and was happy with how it turned out.
What do you think about DIYs? Are you all over them or are they not your thing? Have you been working on your own outdoor oasis? Leave a comment below.
[Want more design inspo and helpful plant tips? Let's hang out on Instagram!]
Enjoy the post? Pin it for later!

If you have any questions or comments, please drop me a note below. Be sure to check back for my response (I always respond) since no notification is sent.
XO,
Tina